Oyumaru/Instant Mold Casting

While prepping some figures for my ongoing Adeptus Mechanicus project I decided to cast up a replacement head for one of the figures.

Way back in the last century I made more silicon rubber moulds than I could count.  I also cast very many items in various resins in them, as it was a large part of my old job working in industrial prototyping.

A lot of people seem to enjoy using those industrial substances at home in their workshops, sheds and hobby rooms and good luck to those people: I hope that they enjoy it.

I on the other hand have no desire to invest time and money in such horrible, toxic and messy substances for use in my house.  Therefore any casting that I do has to be clean, easy and effective.  No vacuum pumps, no multi-part moulds, nothing very complex.  Push moulds and simple two part moulds for tiny items are the limit of my casting desires at the moment.

So I got some “oyumaru” (also known as “Instant Mold”) and used it as outlined below.  I used nothing but basic techniques and I wouldnt really describe it as a “how-to” or anything, but it might be of interest to someone.

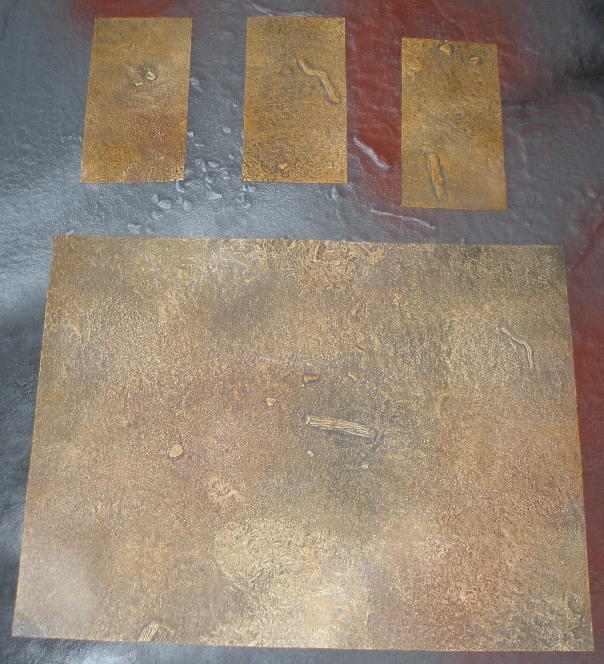
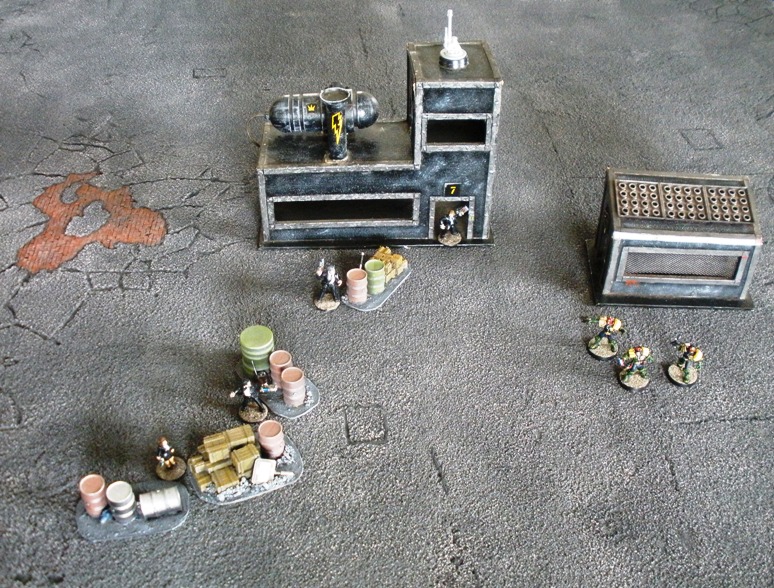
Firstly I selected the replacement part that I wanted to cast: its the hooded and masked head shown on the bottom right in the picture above.

Next I cleaned up mould lines and all of that, filed the underneath of the neck flat and stuck this flat area to a flat piece of plastic (a tiddlywink).

I attached the part to the tiddlywink as I wanted to make sure that I could get the mould rubber to cover the detail on the bottom of the part.  I found it easiest to stick the part to something flat to so that I could work the oyumaru into it while still maintaining a flat base to the mould.  I hoped that this would help to minimise distortion in the castings later while also making the part easier to handle.

Next I got a small bowl of boiling water and the oyumaru.  The oyumaru is the waxy looking long rectangle on the left.   In its room temperature state it has a similar consistency to a low melt glue stick

The oyumaru was submerged in the hot water for a minute or two at which point it became very pliant.  I quickly covered the part in oyumaru.  I ensured that I worked the material under the part and and against the flat plastic tiddlywink.  I also tried to minimise possible air bubbles in the detailed face area by working the oyumaru gently into those details as carefully as I could.

A few minutes later the oyumaru had cooled down and become rigid again.

I prised the part from the tiddlywink.  Then starting at the bottom where the part had been glued to the plastic I used a scalpel to cut through the side of the mould.

I went about two thirds of the way around the mould, gently cutting to the part as I went.  I didnt want to split the mould entirely in two as I didnt want the hassle of having to engineer some way of keying the two halves back together when casting.  Keeping the mould attached would help to minimise that.

Also of note is that I slit the mould from ear to ear across the top of the head, from the parts perspective.  As the head is hooded I figured that those areas would be the easiest to clean flashing and mould lines from later.  Obviously, splitting the mould through highly detailed or recessed areas would make cleaning up the subsequent castings far more difficult (as anyone reading who has ever had to clean a crappy mould line of the side of a miniatures head knows).

I then mixed up some two part epoxy putty (I used ProCreate, which is essentially grey coloured “Green Stuff”) and pushed that into the mould.

Like when making the mould itself, I was careful to make sure that as much of the detailed face area was filled as possible.  The part as it came out of the mould is on the left.  Note the flashing from the cut side of the mould.  Although it looks bad in the photo it really is only a fraction of a millimeter thick, so it took only a moment to remove.

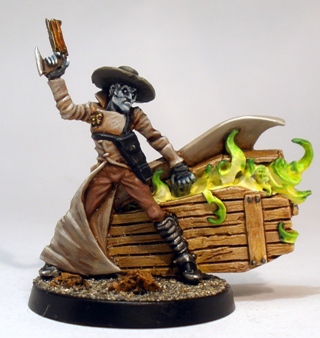
Above is a quick snap of the newly cast head in its new home.  As you can see its a pretty huge figure (from Ramshackle Games) which is why I included the Servitor for comparison.  The size of the target figure isnt really releant anyway, the piece cast was a standard 28mm heroic scale head.

Like that head, the Adeptus Mechanicus cog on the big models chest is also made of ProCreate via an Oyumaru push mould.  That also came out pretty well.

My verdict on this stuff is that its brilliant.  It provides a very simple, low outlay and non-toxic way to replicate miniature parts.  I see this as being part of my hobby toolbox for good.

Advertisement

Malifaux: Lady Justice

Lady Justice

Lady Justice is in charge of the Death Marshal elements of the Guild in Malifaux.  She is a blind, Buffy the Vampire Slayer type cowgirl who, judging by that massive hairdo, moonlights as an eighties rock star…

I bought my Death Marshals box before I had any interest in playing Malifaux.  I bought it because of the cowboy aesthetic that the other figures in the box have.  The Lady Justice figure was not originally a draw for me.

The sculpting is very nice technically but the subject matter and design initially left me cold.  In particular the massive amount of hair on the figure, which spreads left and right to span the length of her sword gives the figure a lozenge shaped silhouette, which doesnt really appeal.  From behind the miniature looks a little like Cousin Itt.

Click for image credit.

Lady Justices voluminous barnet also obscures her scabbard, the strap suspending her scabbard, bits of her fingers and elements of her pistols and holsters in a confusing way.  And I dont just mean confusing to paint (which it was).  I mean confusing in the sense that depending on how the figure is painted and the colours used it can be very hard to see whats going on.

This view is pretty much all that I ever see when I play games with Lady J.

And yet, despite my apathy towards the figure initially,  as I painted Lady J it all started to make sense.  To start with I had difficulty imagining what colours to use as I wanted to make sure that the elements somewhat lost in the hair would be visible and identifiable.  I also wanted the figures palette to tie in with the other figures in the crew but without making the figure too gaudy.

But, as I decided to embrace the (as I see it) eighties rock vibe I found the figure easier to work on.  As I painted my original attitude turned around 180 degrees.  I went for the vaguely Dick Turpin, somewhat Adam Ant and definitely Meat-Loaf-one-minute-into-the-video-shown-below look shown and ended up quite happy with it.

By the time that I finished painting the figure I was really quite pleased with both how it turned out and with the design of the figure overall.  I dont remember my opinion of any miniature altering so drastically during painting before now, but in this case it did.  And it all turned out pretty well I think.

Here is a group shot of my first completed Malifaux faction, the Lady Justice crew.

Lady Justice Crew

Incidentally, the three gravestones were prepped for use in the game when the Death Marshals “bury” opponents in those magic coffins that they lug around.  I dont know if they will be of any use when playing, but they were fun to make anyway.

Comments and criticisms all gratefully received.

Malifaux: Death Marshal 3

My third Death Marshal.

I had a big painting slump last year and it impacted on my painting standard quite badly.  Although I am again starting to remember some of the things that were second nature last year, I seem to have forgotten some others.

This is visible in by comparing the coat on this figure and that of Judge.

I painted the Marshals before I painted the Judge and my treatment of the large smooth areas on their coats differed quite a bit.  I suppose it shows progress at least: the slow process of relearning what I have unlearned seems to be progressing.

The odd spirit flames in the coffin came out at an acceptable level, but after my more successful treatment of Judge Fire recently I had hoped for a better result.

Another issue with this area of the figure is that I was reluctant to try object source lighting techniques when painting it: I am afraid that the apprentice period required to get the technique to a decent level will result in significantly poorer miniatures in the interim.  Well executed OSL may have helped the painting on this figure, but I wasnt prepared to risk it this time.

The final figure from my first Malifaux crew is up tomorrow.  Its the Master of the group, Lady Justice in all her eighties rock glory.

Malifaux: Death Marshal 2

My second Death Marshal.

These guys are quasi-undead, corrupted by the power that they wield.  I went with a blueish skin tone (like I might use for a ghoul, vampire or zombie) to emphasise that these guys are not truly human.

This figure is supplied with his hat unattached.  I stupidly glued it on before painting the figure, which made the face very hard to paint.  Not that it really matters that much, as the figures face will never really be seen.  I wont make that error with future cowboy hat attachment though.

The Marshal figures were the main reason that bought the Lady Justice starter set.  At the time I had no definite intention of playing Malifaux, but the Death Marshals looked like just the thing for my post-apocalyptic, Cursed Earth cowboy terrain and figures.  The poses are fun too, dynamic and comic book-y.

Another Lady Justice figure goes up tomorrow.

Malifaux: Death Marshal 1

Death Marshals are Malifaux law enforcers that have particular issues with the undead and practicers of necromancy.  In order to deal with this threat they have learned enough about the dark arts to become capable of banishing zombies and the like.

This knowledge in turn has warped them into ghoulish characters themselves.  The most worrying evidence of these quasi-dead cowboys altered mental state is that they deem it practical to carry a coffin on or about their person at all times.

“Impractical!” you cry.  “Absurd!” you scream. “Why do they do that?” you utter.  “Meh, whatever.  Its kinda funny.” I mumble.

My Death Marshal paint jobs turned out ok, but not as nice as I would have liked.  Problems included:

Browns: as my miniatures tastes tend to be of the science fiction variety I have rarely painted that much brown over the years.  Brown isnt a sci-fi uniform colour as far as I am concerned, so I have tended not to paint that many things in brown tones.  These guys are covered in browns so getting the right highlight mixes and the like took a bit more trial and error than I would like.  This in turn impacted on my patience and the corresponding paint job quality.  Its alright, but could be better.

Coffin-dodging: I rushed through painting the coffins, and it shows.

Clumsiness: these are heavily detailed, fragile, skinny, multipart miniatures.  I didnt manage to break any of the smaller parts off the figure while painting, but they did make painting the various areas awkward.  The guy above was more of a pain in the ass to paint than one might expect.

Some more Guild figures go up over the next three days.  In the meantime I encourage you to comment or criticise please.

Malifaux: Judge

Judge

The very first Malifaux figure that I am posting up is this guy, Judge.

Judge is a member of the Guild, who are the less than benevolent authoritarian figures in the setting.  He hangs around with Lady Justice and the Death Marshals, who all specialise in taking out Resurrectionists (essentially Necromancers).

As far as I am aware Judge has suffered some severe damage to the lower portion of his face, which is why he wears that bandana… I think.  It doesnt matter anyway as it looks pretty cool I reckon.

Judges Long Arm blade has a pistol built into the hilt, which in game terms allows him to do all sorts of Matrix-y combination gunfire and dismemberment moves in game.

Check out the pistol hilt.

Another figure from the Lady Justice box set goes up tomorrow.


Comments and criticisms on this guy are very welcome 🙂


Malifaux Project

I have started yet another project.  Its Malifaux this time.

Malifaux is a skirmish miniatures game set in a steampunk Western dystopia with horror elements.   It appears to me that this odd mashup occurred because Wyrd Miniatures produced an eclectic range of figures before the game was even conceived and then decided to shoehorn the lot in to the game.

Despite how dodgy this sounds, Wyrd did manage to create a game world that feels unique and pretty coherent.  The fact that the majority of Wyrds miniature output is really very nice also helps.

There are a number of reasons why I have decided to add yet another project to my already ludicrously big list for 2012:

The first and most important reason is driven mainly by the fact that I have found a local miniature gaming opponent and he and I are trying to get a regular Mancave mandate going.   For this to work it will involve a little give and take regarding what games to play and paint miniatures for.  My opponent (hereby known as COM) has a number of Malifaux forces painted up, as well as all of the necessary rulebooks and the like.  Therefore painting up 5-10 figures for the game is an easy buy-in for me.

Secondly I already own a Malifaux starter box of five figures.  I bought them back in ’09 because I liked the look of them and without any plans to play Malifaux.  Because of their cowboy aesthetic I had planned to use them in post-apocalyptic games.  I had not got any further than priming the figures so this gave me an opportunity to return to an old project and get some closure.

Thirdly my post apocalyptic terrain, in particular the Standard Falls stuff  is well suited to the setting.  It is visible in some of the photos of games shown in this post.  It lacks some of the more steampunk elements from the Malifaux setting but a few features that resonate with Victorian sci-fi are easy to add at a later date.

Lastly, it is a very small project and quite easy to achieve.  At the time of writing I have five figures painted with work beginning on others.

Those five figures from my Lady Justice/Death Marshals set will be going up daily here, starting in a minute and continuing daily until Sunday.

Riddick

Richard B. Riddick

I enjoyed Pitch Black when I saw it in the cinema in 2000 or so.  While there were a number of silly coincidences and a pretty unlikely ecosystem crucial to the story, it was a fun sci-fi action movie with an engaging anti-hero, Riddick. Continue reading

“Ruined Land – Scourged Forest” Zuzzy Gaming Mat

The view from my house: not science fiction enough.

As a companion piece to the step by step that I posted about my Wounded City Zuzzy mat, I figured that I would put up a few shots of the process that I went through with for my Scourged Forest mat.

For many years I have usually had some way to represent green areas in games to hand, but I have had an aversion to using them for a couple of reasons.  As I tend to play sci-fi games almost exclusively I dont really want to play games in settings that look like the view from a window of my house: its just not exotic enough.

Green grassy hills somehow feels a bit too cheap, too much like a low budget episode of Doctor Who.  It is somehow inappropriate when my brightly coloured space ranger is seen wandering around shooting his blasters at giant lizard-bugs over grassy dales and hills.  Maybe if I lived in Nevada or somewhere then grassy hills would seem exotic to me, but I dont so it doesnt.  So I have tended to avoid the eighteenth hole look for my gaming tables.

Having dealt with my urban table needs with the Wounded City mat, the other mat that I required was one suitable for alien landscapes and post apocalyptic deserts: something that would fit in well with my ongoing Standard Falls and Planet Heck scenery projects.

Zuzzy dont yet have a desert mat available (although I have heard that there is one in production).  They do have a Sulfur Fields mat available which represents cooled lava flows and the like but something about that mat just doesnt grab me.  I am not sure if it is the paint job in the site photos or the paint jobs that I have seen gamers give it online, but for whatever reason it doesnt conjur up the sort of wasteland image that I want.

So I didnt buy that one and I bought the Scourged Forest instead.

I doesnt really look like much here.

Firstly I took the sample mats that I had and sprayed them with white, black and red oxide primer spray cans.  I hoped that the variation in visual texture that these give would show through the layers and washes above them once finished.

As all of these areas would be covered in layers of paint later there wasnt really any point in being too subtle, so adding lighter (white) and darker (black) tones was an obvious choice.  The red is a less obvious choice, but as some of the other terrain features that I have use the red oxide colour I figured that it wouldnt be any harm to potentially tie them to the mat in any case.

Next I used a paint roller to apply white wall emulsion paint to the test pieces.  I did this because I knew that the Raw Sienna paint that I use for my desert terrain bases isnt terribly opaque, so it would need the white to give it some lift.  Also several thin layers of colour help to make bits like this a bit more believable, so the white layer would help with adding a gradient to the Raw Sienna application.

I made sure that the roller wasnt clogged with paint, the opposite in fact.  I was going for an overbrush/drybrush sort of effect so I removed a lot of the paint from the roller before application.

Once the white had dried I rolled the sample pieces with Raw Sienna.  At this stage I was pleased that the various colours sprayed on earlier were still showing through.  As the samples (and the mat itself) were going to be getting a dark wash as one of the final stages it was impossible to know if the areas originally spray painted would still be visible in the end.

My impatience to get started on the main mat got the better of me after seeing the samples at this stage, so I brought the main mat outside onto a blanket and sprayed it with the colours used earlier.  I focused the red spray on some specific areas sculpted onto the mat and I sprayed the white and black anywhere that I felt like spraying them.

While I waited for the spray paint to dry a bit I plonked a couple of my scenery pieces on the sample mat, just for a look.

I have used cork tiles to make and to base a number of my scenery pieces for a few reasons (cheap, easy to work, interestingly textured etc).  The rocky piece on the left in the photo above is bits of cork tile glued together in layers and then roughly painted with grey, black and a bit of Raw Sienna.

The base of the shack on the right is also made from cork but in this case it was sprayed black as I painted the shack.  In retrospect I should have brushed the edges of the shacks base with white before I applied the Raw Sienna, as it doesnt match the other pieces very well.  So I added a little bit of scenery base blending to the to-do list.

Once the spray paint was dry I rolled the main mat with white emulsion, just like I did with the sample earlier.

While I was waiting for the white on the main mat to dry I started to experiment on the detail on the samples, to see what colours I wanted to use for those.

The brown on the wood was a mistake, it made them look like small cat turds.

The grey on the rocks was ok, but possibly it stands out from the supposedly dusty ground a little too much.

I tested a reddish brown paint on the dried up pond looking elements but I didnt like the result.  There are many of these areas on the map (but very few on the samples unfortunately) so I decided to to underplay them rather than have them stand out too much.

The scrub areas look a little like exposed chipboard, but I hoped that a drybrush of off white will make them look ok, once the washing stages are done.

I enjoy using washes in my miniature painting and terrain making, but it can be a bit nerve wracking, particularly on a large, expensive, irreparable piece like this.  Its impossible to be sure that it will all work out until late in the process.

Now that the white on the mat had dried the next step was to roll on some Raw Sienna.  As I didnt want to apply the paint in very thick layers I did this in a number of stages, the first one being shown above.

Also of note is that while rolling the paint on I then wiped the Raw Sienna off each of the logs and bits of dead tree on the map, exposing some of the white underneath.  I hope that this would with give a look reminiscent of the sort of dead tree stumps and logs that tend to be seen with vultures and steer skulls in Westerns.

This is what the mat looked like after a second thin rolling of Raw Sienna.

At this point the batteries in the camera ran out, so the record gets a bit patchy. So you will have to take my word for it regarding what happened next.

I gave the mat a third, very light rolling of Raw Sienna to cover up any areas where a little too much of the original mat colour was visible.  As the mat was going to be covered in a wash of thinned Raw Sienna/black mix which would seep into the recesses, it was important not to get too carried away trying to get full coverage on the mat.

The individual rocks were painted in a mix of grey and Raw Sienna.  I added the base colour used for the mat to the mix too ensure that while the stones stood out, that they still looked like bits of the landscape rather than bits of gravel perched on top of it.

I lightly drybrushed the scrub areas with an off white colour.  I hoped that after the wash those areas would look vaguely like dried grass.

The broken tree trunks were also given a light drybrush of a light brownish white, sort of a bone colour, so that they would also look like dead plants once the wash had dried.

Finally I mixed Raw Sienna and black with water into a milky consistency and brushed it over the entire board.  I tried to get it into the recesses of the mat without letting it pool too heavily.  Then I left the mat to dry and went to bed.

The following morning the wash had dried.  It had given definition and shadow to all of the more three dimensional elements (around the rocks, in between the cracks in the dried mud areas, into the grain of the dead wood) while also softening the contrasts between the various colour layers.  I am very happy with how it turned out.  After quickly adding some of the colour mixes used to the edges of my existing terrain I was finished.

Like the urban mat, I am very happy with the Scourged Forest mat.   I played a game on it last night and it really is a great surface for gaming on.  At the time of writing I cant recommend these mats highly enough.

Comments and criticisms all welcome.

“Wounded City – Broken Blacktop” Zuzzy Gaming Mat

During my gaming “career” I have used a number of different gaming surfaces.

I once had a table that I had glued sand to and painted, but the downsides of a table essentially made of sandpaper became apparent pretty fast, both on miniatures and on my dice-picking-up-knuckles.

I also once had a table that was made to look like it had panels and various other man-made bits and pieces on it that I used for Necromunda games.  It worked ok but but never really gave me the look that I wanted.  The uneven surface was a bit of a pain for placing terrain on too.

The most commonly used boards that I have had were covered in textured wallpaper and a coat or two of paint.  This gave a soft surface that was good for handling miniatures on and it broke up the flatness of plain old painted boards.

I rushed when painting the my most recent wallpaper board and was unhappy with the results.  Therefore having recently reorganised my mancave I decided to take the plunge and prep my gaming surfaces for what I hope will be the last time, so I bought a pair of Zuzzy mats and had them shipped from the US to Ireland.

Of the various different options available for gaming surfaces these seemed to me to be the best choice.  Being able to roll them up for storage is a big deal plus they also provide a surface with some give for when miniatures fall or are lain on their sides.

Zuzzy mats are made from latex and require painting.  They need to be painted mainly with washes and drybrushing as thick layers of paint will crack off the mat when it is rolled for storage.  Below is a step by step of how I went about painting my urban “Wounded City” mat.

I ordered a number of 6×3″ sample pieces from Zuzzy when ordering the mats, purely to try a couple of painting techniques on.  In addition Zuzzy provided me with a 11×14″ mat for free as an apology for their lengthy shipping times, so I painted that too.


The approach that I took was to drybrush, detail and wash in that order.  The basic colour of the mat is grey so I decide to use that as the base for the asphalt look that I wanted to achieve.  Instead of drybrushing I used a paint roller with limited paint on it, but the principle is the same.

Above is an untouched sample on the left, the second and third pieces have been rolled with a light grey emulsion house paint and the third piece has also had a wash of thinned black emulsion house paint (which is more of a very, very dark grey than pure black really).  I decided that this wash was not strong enough so I added more paint to the wash mix before I tackled the full 6×4″ mat.

Above is the unpainted 6×4 mat.  The wobbles visible in the shot above tend to flatten out once it has been unrolled for a while, but I took this photo just after unrolling it.

The shot above shows how the mat looked after a quick highlight coat of light grey via roller.  Naturally while I desperately tried to avoid leaving a pattern from the roller I managed to drop a few blobs of paint in a couple of areas.  After a fair bit of swearing and a couple of aborted attempts to remove the blobs I decided to come back to them later in the process.

Despite this it was quite fun rolling this coat on.  This mat has a lot of surface detail that is easily picked up with drybrush/roller techniques.  The detail on the mat is quite crisp, much more than I expected it to be really, so it was pleasant to paint when I wasnt clumsily splashing paint everywhere.

Next up was the exposed brickwork under the cracked bits of road.

I know next to nothing about the construction of roads but as far as I know there are not many bricks used under asphalt in this part of the world.  If there are then they are definitely not terracotta coloured.  I decided to paint them as red bricks simply because I thought that it would provide some visual interest to the board.

I used a mix of some craft colours that I had in a wash to tint the brick areas, rather than paint them.  This was so that I didnt build up too much paint on the mat.

The most enjoyable part of the process so far was this stage.  The asphalt represented on the board is of the “wounded” variety, so in addition to exposed subterranean brickwork there are also cracked tarmac areas.  Also visible is the patchwork of tar bits and pieces that are seen on roads covering up various damage and other works done.

I stippled the tar areas with black emulsion straight from the pot. I didnt want to strictly delineate the cracked areas with paint as I thought that it would look too harsh so I painted black emulsion thinned with water into the cracked areas in a semi-random pattern.

I also stippled paint onto some of the blobs from the first stage at this point.  They tended to blend in with the other supposedly damaged and repaired areas pretty well which was a relief.

I also drybrushed a lighter tone of the colour used for the terracotta brickwork wash onto the bricks.

The last stage of this rather quick process was to wash the whole mat with thinned down black emulsion paint.  Apparently it is possible for the mats to warp and distort if they are drowned in water so as a precaution I dabbed up a lot of the excess wash with paper towels as I was applying it.

The wash served two purposes: it helped to define the recesses of the mat in comparison with the highlight areas while also reigning in and slightly unifying the tones used on the whole thing.

After that was done I put a dehumidifier in the room (to speed up the drying process, just in case leaving the mat exposed to watery paint for too long would cause distortion), shut the door and left the mat until the following day.

Above is a shot of the finished mat including some now twenty year old terrain.  After literally working from the ground up the next on the urban terrain list is some new buildings…

Despite the ropey old terrain and dodgy lighting in the shot the surface texture is visible.  Its a great surface for gaming on and I am very happy with how it turned out.  It was very fast to do as well it only took easily under two hours to paint, discounting drying time.  Its not that big a project or time investment and it gives a playing surface that really is pretty hard to beat.

I did my wastelands terrain mat next.  I did the urban mat first as I figured that it would be a easier to do and the experience gained from that could  help with the more complex wasteland mat.

%d bloggers like this: