

I have wanted a graveyard terrain set to game with for many years, but I never got around to picking up the many expensive crypt, mausoleum, gravestone and perimeter pieces required.
Then Games Workshop released the Garden of Morr graveyard kit last year. It looked like a convenient and reasonably cost effective way to cover my toy soldier graveyard needs so I picked up a couple of sets last Autumn.
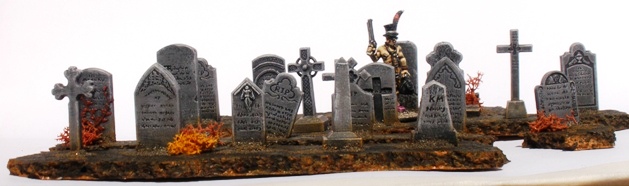
After some consideration I decided that I would prep the graveyard to fit with my wasteland terrain. The classic movie graveyard tends to be a bit greener than that and for a while I was tempted to go for that more Transylvanian look. I have a bit of an aversion to playing games on green, golf course like tables however and as I had already painted up some Renedra gravestones that I picked up at Salute last year to match the wasteland terrain, I went with that again here.
The Renedra gravestone kit is straightforward and very nice. The Garden of Morr is fantastic. It goes together very easily without need for clamps or rubber bands or anything fiddly. It also looks really nice when assembled, even before painting.
The painting process took me a few hours each day for about four days or so. I tend to be slow at things like this so its possible that some time could be shaved off that I reckon. Below are the steps that I used to prep the lot, which should give anyone interested an insight into how I approach projects like this, for better or for worse:

Parts were clipped from the frames, mould lines and the like were cleaned off and the loose gravestones were attached to cork tile bases.

Everything was sprayed with matt black acrylic car paint.

Next all of the pieces were lightly sprayed with grey primer spray from above. I recently read somewhere that the kids call that “zenith highlighting”. Who knew? Cat provides cheerleading section.

All of the parts were then given a pretty heavy drybrush of white acrylic. Note the Deadwood DVDs that were running on the laptop while I worked, helping to keep me in a cowboy frame of mind.

Some areas were tinted with washes of ink and/or thinned paint. Detailing started in some areas. Another cat provides aesthetic critique. Note the DVD rental of Cowboys and Aliens which I had hoped would keep me in a Western frame of mind. It didnt. Dont watch it, its depressingly awful. If I believed in souls then “soulless” would be an apt description.

More detailing. The most significant progress here was on the mausoleum roofs, although various other elements were also layered up. This was usually done with a single tinted translucent colour so that the black through grey through white beneath showed through. Painting GW Tin Bitz on the railings was the most tedious part of the whole job.
I am not really a GW basher: I have had plenty of fun with their products over the years even if I dont tend to have a whole lot of interest these days. But there was a somewhat amusing element to this kit that I thought that I would mention.
GW products get a lot of stick about their propensity to stick skulls and skull motifs on any vaguely flat surface. A graveyard seems to me to be one of the few places where its possible to get away with that sort of thing, but the GW designers decided to go berserk with skulls on the Morr kit.
Out of (morbid) curiosity I counted the skulls and skull motifs on the set.
A Garden of Morr features:
- 244 “human” skulls
- 115 skull motifs
- Total 359 skulls per kit
I assembled two kits meaning that I quickly painted a staggering 718 skulls. Hilarious.
A few skulls here and there is fine with me as I am not going for a realistic looking, architectural style piece. The sort of graveyard that featured in Buffy or Scooby Doo is what I was looking for. Even so, that really a lot of skulls.
If the vast amounts of head bone on the kit dont bother you then I thoroughly recommend it, its very practical in game terms and it assembles very quickly and easily. I would not recommend buying the kit with the intention of removing most of the skulls and skull motifs as it would be a huge pain in the arse. I am sure that some people would do it, but it would feel like a waste of time to me.
Photos of the finished elements of St Craniums Cemetery will be posted up on Wednesday.
Filed under: Terrain, Workbench | Tagged: 2012, Malifaux, St Craniums, Standard Falls |

That….Is a lot of skulls! It is almost a GW trademark!!
Graveyard is beginning to look pretty damn good!
LikeLike
Thanks Lord Siwoc.
The Morr kit might have too many skulls to be used in a “realistic” modern setting like Gravesend, depending on taste. I plan to use St Craniums in my modern games anyway.
Some photos of the finished graveyard pieces will go up in the morning. I also started work on some extra bits to match the graveyard set last night. They should get finished over Easter.
LikeLike
[…] Graveyard WiP […]
LikeLike
amazing job, could you tell more specific how you painted that greenish roof
LikeLike
Hi Relic, thanks for the kind words.
I make notes while I paint miniatures but I rarely do when painting terrain. Therefore my memory of how I painted the roofs is hazy. I *think* that it went as follows:
1) block in the area with a dark blue/green/turquoise. I used an old Warzone paint but GW Hawk turquoise with a little dark blue and maybe even a spot of black added would do it.
2) wash the area with a dark brown (Devlan mud or similar)
3) stipple the area with the original colour generally avoiding the edges and focusing on the middle of the panels.
4) stipple the area with the original colour mixed with a little white. Generally I added paint within the area defined by the previous stippling stage.
5) lightly wash the whole area with turquoise ink. I used an old GW Turquoise wash, but some sort of blue/green wash mix will do. I would use an ink rather than a mix of paint here as the translucency will help the layering of the colour, making for a more complex and eye pleasing finish.
6) a light stipple of the colour from step 4 was added.
I cant swear that that is exactly how I did it, but it sounds familiar. I hope that it helps.
You have some interesting stuff on your blog by the way. Im going to check it out properly over the weekend.
LikeLike