


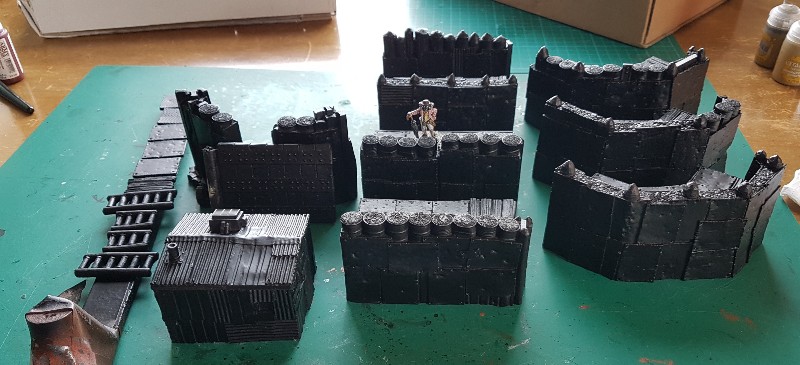
I have been painting a lot of terrain recently, largely ruined post-apocalyptic and science fiction items.
I have been enjoying the process more than usual, primarily because I have decided on a technique that rapidly gives me a rusted, industrial ruin effect that I like and with very little precision work required.
It uses spray cans, but not an airbrush.

If you are interested in the process, then take a look.
Mission Statement and Preamble
The aim here is to get a decent tabletop level paint job ready in a short time. Depending on how you approach Step Two, it is possible to incorporate all sorts of subtleties into what is essentially a fairly neutral, but hopefully evocative backdrop for toy soldier games.
If you want diorama level finish, then look elsewhere. If getting the things from the box to the table fairly fast while still looking pretty good appeals, then this works.
There are two main visual influences on the project:

“We’ve located that by the old mill in sector 3D, now where’s that backup?”
1: Robocop is one of my favourite sci-fi movies, for all sorts of reasons. The abandoned old steel mill in the final scenes has a lovely decayed industrial look.

2: San Diego has become a landfill in the Bladerunner 2049 setting, which leads to a visually striking sequence, in a film full of exceptional visuals. As soon as I saw it I knew that I could make an evocative terrain set that echoed the scene, at least a little bit.
In 40k terms I imagine my ever expanding terrain set to represent some regions surrounding an Imperial hive, or parts of Angelis maybe. Perhaps the rusted remains of a bombed out area.
I did some research into how other people approached things like this before I committed. My method changed a bit as I proceeded through various iterations of this approach, but the core inspiration for the process spun out of the “Sonic Sledgehammer Studio” YouTube video below.
Credit is due to Sonic Sledgehammer Studio for the very significant kick off point for my plan, and for being the generous sort who makes useful tutorial videos available.
My process uses similar principles as Sonic Sledgehammer Studio above, but with a few tweaks.
The Process
Step One: Spray Black
Step 1: Black Spray.
Spray the terrain black. Easy
Step Two: Accent Colours

Step 2: Rough blocking of coloured panels, AKA the “Duplo Stage”.
Paint various elements in other colours to visually break up some of the uniformity. Where and what is up to you, but I usually go for areas with well defined panel areas if possible.
I stipple the paint on, focusing on the centre of the panels and intentionally not going as far as the edges, leaving them black. This makes this process less taxing and faster to execute, while adding a little bit of what will eventually turn into weathering by the colour transition.
Picking the colours for this stage could be a blog post in its own right, so I’m not going to get into it too deeply. Use colours that will go well with your terrain or army scheme or whatever you think might work. Bear in mind that these colours will be deadened significantly by later steps in the process.
I tend to add the following accent colours, in various quantities:
- off white/light grey
- dark blue
- dark red
- bronze
- gunmetal
As you can see, the models look awful at this point, the “Duplo Stage”. Have faith. Once this is done, the most tedious part of the job is over.
Step Three: Transfers
If you want to add transfers to the model, then now is the time to do that in the normal fashion.
Step Four: Light Spray of Mid Brown

Step 4: Light dusting of brown spray paint.
Lightly spray the terrain with a mid-brown colour (I have used Army Painter Leather and Mournfang Brown to date) from a roughly 35-45 degree angle from the top. This “zenithal” spraying is not intended to completely cover the terrain piece: the idea is to leave black in the shadows and recesses.
The brown spray will also deaden the accent colours added in Step Two, but not obliterate them. If you think it is necessary, then stipple a small bit of the accent colours in the centre of the various areas to re-establish them a bit after spraying.
Step Five: Red Rust

Step Five patches of Red Oxide Primer.
Spray patches of the model with Red Oxide primer (available from car paint suppliers). On models that feature areas of deteriorating metal, focus the spray on the edges of those: damaged walkways, exposed structural elements etc. On models that are not obviously in a state of disrepair, then put a few patches wherever you think makes sense or looks good.

Step Five intentional smudging of the Red Oxide Primer spray.
If you feel brave you can go in and smudge some of the paint with your finger in the moments after it has been sprayed.

Step Five intentional smudging of the Red Oxide Primer spray.
It can give a good rusty effect later, but it’s not a requirement.
Step Six: Rust Texture
Apply some Citadel Typhus Corrosion or Vallejo Smoke or other brown paint containing grit from other manufacturers towards the centre of each of the areas painted in red oxide primer. Two coats works well for this sort of approach.
Feel free to use your fingers to smudge the edges of the areas of the Typhus Corrosion, to blend the edges out a little. Doing this helps to make the next step a little more convincing, but really, you don’t have to be too fussy.
Step Seven: Heavy Rust Texture (optional)
I used a small amount of Citadel Stirland Battlemire texture paint to cover any areas that needed to be filled or obscured due to various assembly reasons. I treat it from here on in exactly like the other rusty areas.
Step Eight: Orange Rust

Step Eight: orange drybrushing on rusty areas.
Drybrush the Red Oxide Primer and Typhus Corrosion areas with Citadel Ryza Rust. Doing this in two coats gives a better finish than trying to do it in a single coat.
Two coats also makes it easier to fade the Red Oxide Primer/Typhus Corrosion/Ryza Rust together in a pleasing way, if you want to, but be exactly as fussy as you feel like being. The intention is to create an ambience, with broad strokes. Don’t get bogged down in the detail
Step Nine: Light Drybrush of Mid-Tone Metallic

Step Nine: drybrush the metal with Necron Compound.
Lightly drybrush the entire terrain piece with Necron Compound (or another similar steel colour). This bit is simple, and quite enjoyable I find. All of a sudden the various different colours underneath unite, but remain distinct in a very pleasing manner.

Step Nine: drybrush the metal with Necron Compound.
You can avoid the orange, rusty areas during this stage, if you like, but I find that a very light pass over the rusty areas helps to tie the various areas of the piece together a bit.
Step Ten: Grounding

Step Ten: Dryand Bark is smudged onto the bottom 8mm or so of the pieces.
Find an appropriate, usually dark but maybe bright like dry dusty sand, neutral colour to blend the terrain into the gaming surface that you plan to use the piece on. In my case, as the terrain will be on a bleak, dark, post apocalyptic surface, I used Citadel Dryad Bark, a dark chocolate brown. Stipple/smudge/brush that colour onto the bottom 8-10mm or so of the terrain piece.
And that’s it. Nothing fancy. Ready to hit the table for your heroes to look good stomping around.
Final Thoughts
If you want to add a little more visual interest to various elements, then you can.
Maybe one of the barrels in a pile would look good with a hazard marking or logo.
Perhaps the decrepit looking control panel attached that pile of machinery would benefit from having what appears to be a functioning VDU, to fit in with interactive terrain ideas that you have.
Graffiti might suit the run down area that the terrain is supposed to exist in.
It’s possible to add all sorts of detail at this point, if you want to.
The important thing is that the terrain now has a nicely layered, decrepit look that is easily good enough for gaming in and around with, plus it doesn’t take that long to achieve. Rapidly painting terrain gives a specific sort of kick I find: it feels very productive to be able to take a pile of grey resin or plastic on Friday evening and be able to have a full tables worth of basic stuff ready by Monday.
Lastly, on a more macro level, if you really want to get a full tables worth of themed terrain done, I suggest that you get stuck into a lot of smaller bits first: shacks, small buildings, “L” shaped smaller ruins etc.
These smaller pieces are like the “extras” in the establishing shot of the gaming table. Once they are done you are free to work on a few larger landmarks, each of which will add depth and interest to the already adequate table. That’s a better result than a couple of rusted monoliths in an empty battlefield (which admittedly has its own appeal too, but that’s not what this post is about).
Hopefully that is of some use to some of you. A good example of the finished product is in my Fort Hardknox posts, part one of which is here.
Filed under: Terrain, Workbench | Tagged: 2019, Fort Hardknox, Post Apocalyptic, Sci-fi |

That’s a hyper useful tutorial, and the results are impressive.
LikeLiked by 2 people
These was a large increase in speed painting these over the other recent batches of terrain that I worked on. The return on time investment is very satisfying, far more satisfying than depressing grey plastic and resin in boxes waiting for the day that they will get the “full treatment”, a day that wont ever come.
I hope that you try it Mr S. I think that using different coloured sprays over similarly basic but differently coloured accents could generate all sorts of odd and interesting results. You could be just the man for that I think.
LikeLiked by 1 person
There are several techniques in this post that are going right in my toolbox. Stippling colour on, the spray techniques, the rubbing of wet spray for starters. The semi-random nature of the results really work well. What’s most exciting is the superb results you got. Fast and good? Sign me up kid.
LikeLiked by 2 people
The semi random aspect is important, making a virtue of the speed, rather than speed of the process being immediately indicated by a sub par finish.
I’m really looking forward to spinning some of these elements into painting toy soldiers, rather than just terrain.
LikeLiked by 2 people
Great work squire – I’m a bit of a goon in the painting stakes, so this sort of “how to” is super useful.
LikeLiked by 2 people
Well, if you have terrain sitting around waiting for attention, then this is a good way to get it done.
Step Nine can be done with a bone colour rather than a metallic in order to finish things like brick too. The critical thing is that it’s all easy to do, and easy to do rapidly.
I hope that you give it a try Conrad.
LikeLiked by 1 person
They really turned out brilliantly Mr Shoe. I reckon painting terrain fast and simple is really the only way to go with them for a post apocalyptic setting. Unlike minis you never pick them up to look at them closely so there’s no point getting them perfect as well. The effect you’ve achieved on the fort looks amazing, I doff my e-cap to you sir 🙂
Just as a side note, not sure if we talked about this before, but did you see the WETA vid on the model build process for that trash heap? Here is the link just incase:
Skip to the 2min mark for it. I sooooo wanted to push all of those guys aside in that video so that I could start plonking minis down and make pew pew noises 😀
Great build and informative tutorial Mr Box
Cheers 🙂
LikeLiked by 2 people
Thanks for the kind words Mr P. Great video too! Behind-the-scenes videos and photos like that are probably the main reason that I am in this hobby. The idea that it is possible to make convincing 3D worlds with your hands left a large mark on me as a kid.
I obviously don’t have the multi-million dollar budget behind me that Weta and their ilk have, but doing the best that you can with the resources available is part of the ethos too.
I’m pleased with the effect that the above technique generates in a relatively short space of time. I plan to experiment with it more in future.
LikeLiked by 1 person
Your timing is impeccable mate, I’m going to be making a start on terrain for Wolf Time in the very near future, and this is just the sort of look I’ll be going for – thank you!
LikeLiked by 2 people
I’m usually quite circumspect about giving advice or tutorials, but as I have painted quite a bit of terrain with this technique, the large majority of which has yet to to be blogged, I am comfortable saying that this is a winner.
It’s forgiving, it’s fast and most importantly of all, it’s finished. The miniature Mona Lisa can wait.
LikeLiked by 3 people
Gorgeous, and thanks for the tutorial! If I ever get (or rather it’s a case of when) back to post-apocalyptic gaming, this will come in handy. I like how people share tutorials on their blogs, it’s a very solid way of giving back to the wider community – not that there’s an obligation, but in my view this is one of the things that makes the whole hobby so enjoyable.
LikeLiked by 2 people
Our blogs are both ten years old as of some recent date. While I don’t think many people read blogs regularly any more, what’s interesting about the format is that while forums are dying and FB is a noisy mess, hobby blogs remain as a portfolio of sorts for now.
It’s interesting, and unexpected how the format remains relevant for things like toy soldiers, providing archives of info. Very satisfying.
I hope that when your pirate fetish wanes a bit that you will go back to post-apoc of one variety or another, although there is plenty in this tutorial that can be applied to salty water areas too I expect Mikko 🙂
LikeLiked by 1 person
I really enjoy blogs as a format. I’m not a huge fan of videos and while social media platforms like Facebook or Twitter are nice for photos, I definitely enjoy the “slow journalism” of blogs as well as their persistence. I often find myself going back to other people’s (and my own) from years and years back, and it makes me happy that such things exist.
LikeLiked by 2 people
Amen.
LikeLiked by 1 person
Very nice work, Cheetor. Who can disagree with a Robocop or Blade Runner aesthetic?
LikeLiked by 2 people
It’s true, both absolute classics, and BR2049 is visually stunning. The main risk with citing references of that calibre is being directly compared 🙂
Thanks for the feedback Warburton!
LikeLiked by 2 people
Useful tutorial, the result is perfect.
I love (^_^)
LikeLiked by 2 people
Thanks Nico. I’m trying to get faster with hobby projects. I need to get faster or dramatically reduce the number of projects that I hope to get around to, so I’m trying to work smarter not harder, a skill that you are an undisputed master of.
Im glad that you like the tutorial, thanks for the feedback.
LikeLiked by 1 person
As one who last year had my first foray into rusty terrain, I am impressed by your results and the tutorial. Rust is fun, because it is random, and you can create the look you want. Did you hand paint the graffiti? I think overall that these pieces are great and would add so much to any apocalyptic game. Kudos!
LikeLiked by 1 person
Thanks Mark!
The graffiti is freehand, but I’m certainly in no position to write a tutorial about that 🙂
It’s good enough for big wall pieces though.
LikeLiked by 1 person
Looks great. Thanks for the step-by-step!
Also I’m stating by years what the YT video author says as premise: terrain should blend in the background when you play.
LikeLiked by 1 person
It’s tempting to get carried away on terrain pieces, but if gaming is the goal, then it’s best to go with something like this method I think, both for speed and for backdrop.
Thanks for the feedback Gabbi!
LikeLike
I wish your write-up had been around before starting my fort. I like your philosophy of getting a big pile of set dressing done, and breaking away entirely from the idea of “painting a finely detailed Citadel Miniatures kit”. I’m going to cannibalise your best ideas for a set of Azyrite Ruins, I think, where the approach is to paint a table’s worth of terrain with overall visual strike value. Thanks for sharing the insights!
LikeLiked by 1 person
Brilliant! You will do a savage job on those Azyrite ruins, I’m so tempted to pick up a set of them.
Yeah, I’m trying to get a bit more “fine art” (less precise) with my toy soldiers. I need to get more done, faster.
LikeLike
[…] Rapidly Painting Rusty Terrain […]
LikeLike
You’re a star mate! Using this for sure!
LikeLiked by 1 person
[…] I also prepped and painted four “gates” (checkpoints) for Gaslands alongside the gas station and diner. All received a rapidly achieved, abandoned, decrepit looking paint job, more or less identical to that done on my 28mm terrain earlier this year (details here). […]
LikeLike
[…] used the same technique as the other Gaslands pieces that I have worked on recently (and the various bits rusty terrain […]
LikeLike
[…] Part of the reason that I took on this project was that I knew exactly how I would paint it, and I could gauge how much time it would take, based on actual experience painting similar. I even wrote a blog post including a step by step of how I did it on previous items, so for info about painting these, take a look at that guide. […]
LikeLike